Wednesday, December 29, 2010

@ 2 Unit Single semi Detached Housing Project@


click here link to buy at SL marketplace

Click Here  visit  inworld
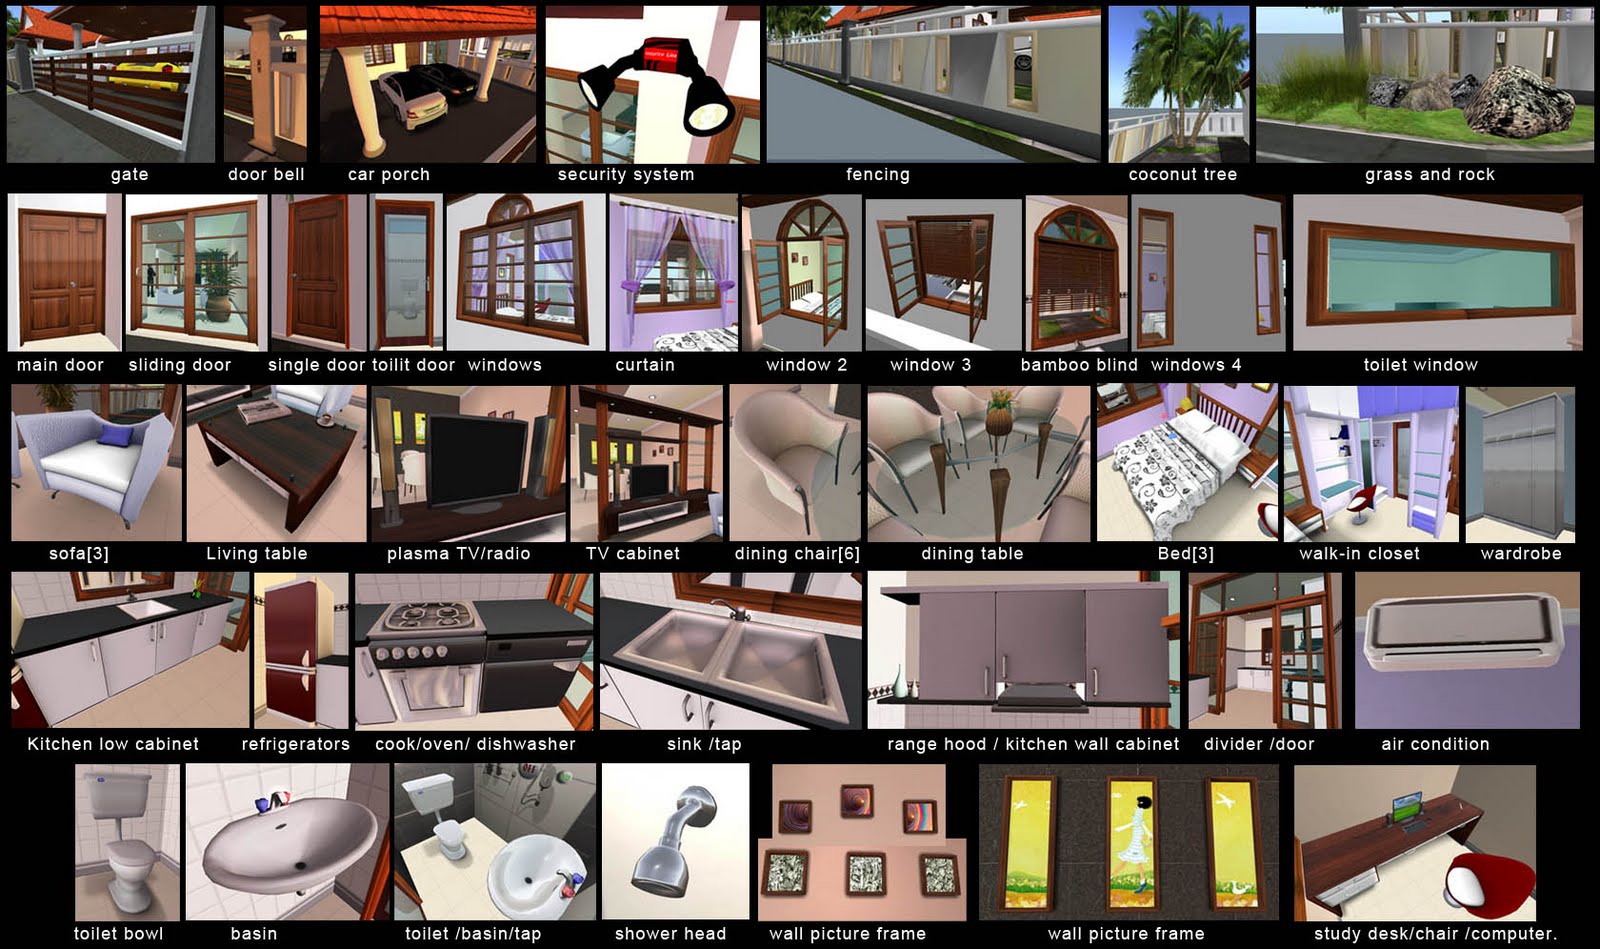
Features

-Using AUTO-REZ FAUX system
-use AEONVOX DOORS SYSTEM
-Use [nautilina]shower system
-use [Hez]driven multi-sit
-use [Micro Union]Sliding script
-use [City Builder]sculpture and furniture
-use [Mesh Mode] chair and sofa
-Use [FreeView]TV

-11.5 Meters tall
-2 unit Semi Detached house join together.
-( all in 604 Prims with furniture)
--32x32m Base/Footprint(good to fit at 4096 sq.meter square land)
### remember to Deactivate the security system after rez a house##

#Semi Detached House#
[the furniture only fit in 1 unit]
you can take copy the furniture and rez to another unit.

1. Landscaping
*rock,grass,and coconut tree
*driveway and ground grass
* fencing wall and sliding gate door.
*DoorBell each unit.

2. Car porch for 2 car.

3. security system and spot light for 2 house

4. sculpted roofing and ceiling

5. Lockable Main entrance Door and side sliding door

6. Living hall
*sofa set with 1 prim shadow [ with difference sit poses ]
* Living table with shadow
* TV Cabinet with shadow
* Plasma TV and radio[55 channel]
* halogen light
* wall picture frame[1]

7. Dining
*6 dining chair[with difference sit poses]
*dining table with shadow
*wall picture frame[3]

8. Study room
*study desk
*chair with one pose
*Desk Top PC

9. Kitchen
*kitchen low cabinet
*Kitchen top cabinet
*kitchen double bowl sink[2]
*refrigerators
*Oven
*Gas cook
*range hood
*dishwasher
*drawer
*kitchen display item
*close/open sliding glass door
*glass divider for wet kitchen and dry kitchen
*windows open/half/close [2]
*window Bamboo blind [2]
*kitchen wall tile
*
10. Bath room at master bed room.
*Toilet Bowl with 4 animation pose.
*sink and tap with 3 animation pose
*shower head with sound and water.
*3 shower animation Poses.
*toilet sliding door.
*toilet wall tile

11.Toilet
*Toilet Bowl with 4 animation pose.
*sink and tap with 3 animation pose.
*sliding Door

12. Master bed room.
*lockable door.
*74 animation pose Bed/side bed table,table lamp and pillow
*walk-in close set with sliding door.[Wardrobe]
*dressing table with 1 pose chair.
*Book shelve and display cabinet.
*Curtain with open/half/close option.
*window with open/close option
*air-condition 1 unit
*Wall picture frame [3]

13. Guest room 1.
*lockable door
*74 animation pose Bed/side bed table,table lamp and pillow
*Curtain open/half/close.
*window with open / half /close option
*air-condition 1 unit
*Wall picture frame

14. Guest Room 2.
*lock able door
*74 animation pose Bed/side bed table,table lamp and pillow
*Curtain with open/half/close option.
*window with open/half/close option
*air-condition 1 unit
*wardrobe

photo gallery

Click the photo to enlarge


Bed's Instruction

How to use bed V 9.0


OPERATION:

- Click the bed to switch it on
- When everything has loaded click again for the menu
- Select a submenu containing poses, poseballs will appear automatically
- Sit on your poseball (Right-click - LOVE)
- Select a pose, the animations will start
- To return to the default stand pose, select 'STAND'
- To remove the balls, select 'STOP'
- To switch-off, select "ShutDown" twice (but you can leave it on after use).

TO ADJUST POSITIONS:
Select a submenu containing the pose you want to adjust, sit on the balls and select the pose you want to adjust.
Go back to the main menu, select "Options - Adjust Pos", this way the balls are changed into transparant beams. Right-click a beam, select Edit to adjust the position (hold Shift to select both beams). You can position the balls anywhere within 10m from the Bed
"Save Pos" will store the position into memory.

TO ADJUST HEIGHT OFFSET (Z):
Select "Height Adj" and click the "Z"-buttons, this will adjust the height for all poses. (Note: the offset height is stored in the Object Description, so any descriptions will be replaced).

ACCESS TO THE MAIN MENU:
The owner is the only one who can start/restart/shutdown, in all cases.
- if "Options - MenuUser" is set to OWNER: the owner is the only one who can access the menus
- if "Options - MenuUser" is set to ALL: anyone can access the MAIN MENU
- if "Options - MenuUser" is set to GROUP: members of the same Group as the MLP object can access the MAIN MENU (the MLP Group can set by right-clicking MLP and selecting Edit, More >> General tab - Group: Set)
Note: even if "MenuUser" is set to ALL or GROUP, individual SUBMENUS can still be blocked (you can define access for each submenu in .MENUITEMS, see examples in .MENUITEMS).

How to setting Radio and TV

How to Listen the radio


Touch the radio ,when driven menu pop up,select the channel you want to listen.

How to setting FreeView TV.To Play Movies in Second Life:


Press - P
Go to Audio/Visual
Make sure you have "Play Streaming Movies" Checked, also "Play Streaming Music" if you like.

After that you should have a movie control on bottom of your screen.

If you still don't have a movie control on bottom of your screen, you will have to download Quicktime Media Player (to play any movies in Second Life). Go to www.quicktime.com and install their free movie player, after that you will have a movie control on bottom of your screen.

Just press play to see the show!

- Setting FreeView on a parcel owned by a single person

1. Drop FreeView in your parcel.

You're done.

Dont worry about the "FreeView Remote" object - feel free to get rid of it. It is only there for group owned parcels. You do not need it for a private parcel.


- Setting FreeView on a parcel owned by a group.

1. Set the object as "Share with group", and make sure that all of its permissions are enabled (copy, modify, transfer).

2. Enter the object's contents, and make sure that all its internal items are also set as "Share with group". Make sure that they are also all checked as "copy, modify, transfer".

3. Set the object's affiliation to the group that owns the parcel.


4. Press the "Deed" button to make the object owned by the group. (only group officers can do this. Ask a group officer if you are not a group officer.).

And thats it. To use the television controls, make sure that you have your group title selected. FreeView will open the menu only to its owner, or people who have the same group affiliation as itself.

NOTE: The WebGuide does not work straight out of the box on group-owned parcels. To configure the webguide on group parcels, please read the following section: "Setting up WebGuide support on Group-owned parcels".

- Setting up WebGuide support on Group-owned parcels

As part of the SecondLife limitations, group-deeded objects cannot open browser URLs.

To overcome this limitation, FreeView has a special "FreeView Remote" object available in the package.

To configure this remote, perform the following steps:

1. Rez the remote object next to the FreeView viewer object.

2. Set the remote's group affiliation to the parcel's group to prevent an auto-return.
** DO NOT DEED THE REMOTE TO GROUP **

This is important. Just leave it owned by a single person, yet group affiliated.

3. Click the FreeView TV and go through the following menu options:

Video -> Configuration -> Set Remote

You're done.

The remote will now open the URLs for you whenever you choose to open on FreeView!

- Letting other people use FreeView on your private parcel

Normally, FreeView will only listen and open the dialog menus for its owner. However, if you wish to allow other people to open the dialog and control the script, you can perform the following steps:

1. Edit the object and set it to a group.

Thats it. From this moment, anyone who has the gro
up you chose active and selected on themselves, will be able to open the menu on the object.

- Access controls on group-owned land

When Deeded, FreeView will open its menu and accept commands from anyone who is a member of the group it has been deeded to. The person does not have to be an officer. (Scripts cannot detect if a person is a group officer or not!)

There is no way to limit FreeView to interacting only with select people. To do so, please look in the next section: "Advance modification of access controls in the source".

Click the image below to more detail for FreeView with SLGuide Help!


Video Tutorials:-click the below Link to Video URL

PARCEL MEDIA: Play webpages, movies & more - Second ...

How to use toilet bowl, sink and shower


How to setting the security system


Property Security System

Protect your Land,house,skybox,club and customers in store/club are safe

this "Security System " is only work for Land owner

1. when you rez a "security system".it will start eject the person who are not in the" whitelist".

a. to deactivate [stop] the security system.please type a command in local chat :-
" /9 off " the security will turn off.
b. To activate the security system,please type a command at local chat:-
"/9 on " the security will start to eject the people are not in" whitelist"

2.How to change the range the security system coverage the area.

to change the range ,please type at local chat:-
" /9 range [the number...meter u want to cover]..example for 5 meter.
"/9 range 5"

3. How to reset the security system.

just type at Local chat :-
" /9 reset "
4. How to Eject the people use security system

right click "security system"...edit...go to content . open a "whitelist" note card
you can see the example name list in "whitelist" note card ,
just type in or replace the people name who you allow them in your area.
the people name who are not in "whitelist" will auto eject.

DOOR INSTRUCTION

Menu Options

-----------------

***NOTE: To bring up your configuration menu: Make sure your 'edit window' is closed, then left-click and hold over the door. After a few short moments your setup menu will appear.


CloseOn/CloseOff --> Turns 'auto-close' on and off

Lock/Unlock --> Locks and Unlocks the door
NO ONE can open a locked door


Private/All --> Switch between Private-list Use and Public-Access
For more detail, see 'GroupOn/GroupOff' and 'Add/Delete/List' in 'advanced' options

AutoOpen/ManualOpen --> Door will either auto-open on approach or require click-to-open

GROUP:
If yes, will default the door to allow access only to the group that it is set to
Set the door group by using the 'Set...' button on the 'Group:' line in the 'General' tab
If a door is 'Private', group will not function.
If a door is 'Group' it is not usable by anyone not in the group.

NOTIFY:
If yes, will default the door to notify owner of all uses

GroupOn/GroupOff --> GroupOn gives members of the group the door is set to 'user' level access to the door
Set the door group by using the 'Set...' button on the 'Group:' line in the 'General' tab of edit

Add/Delete --> Add or Delete persons from your private user and owner list
Users are then added with /99 u+Avatar Name
Owners with /99 o+Avatar Name
Users are deleted with /99 u-Avatar Name
Owners are deleted with /99 o-Avatar Name
Owners get FULL configuration menu access
Users can ONLY lock/unlock and closeon/closeoff doors
Both Users and Owners have access to "Private" doors
The actual door owner is ALWAYS allowed Owner access, and need not be listed

List --> Lists all persons on your User and Owner lists


If you add the manager to the door .so the manager menu is same with your configuration menu
he also hv permission to add some one [Hotel Guess] to the door


List --> Lists all persons on your User and Owner lists


the hotel guess only hv permission to lock and unlock the door.